Introduction
Excel is a spreadsheet. It's role is the creation and analysis of decision-making models. Every document, or file, consists of several worksheets containing 256 columns (named A to IV) and of 65536 rows filled with cells in which you can enter either text, numbers or formulas.Every cell of the document has a unique address. It is determined by the place where it's located in the spreadsheet. For example, the very first cell in the upper left corner of every first sheet meets itself in the column A on the first row. So the address of that cell in regards to it's position in the columns and rows is called A1. It's at the junction of column A and row 1. The cell address just to its right is B1 and so on. Also, every cell can contain up to 65 000 characters.
These cells are all on the first worksheet named Sheet1. You can have up to 100 worksheet in a single spreadsheet file. That will allow you to make "in depth" calculations. That's more than enough room to create your own models. But sometimes, it's useful to get some numbers that are from other spreadsheet files. Excel can help you link those files together.
Moving inside the spreadsheet
There are several ways to move inside an Excel spreadsheet. You can always click on the worksheet and on the cell that you need. Here is the list of keys that you can use to move.| Cursors | To move to a cell towards the left, right, up or down. |
| Enter | To accept the text, the number or the formula that was entered in the cell. |
| Tab | Moves the cursor a cell to the cell on the right of the active cell. |
| Shift + Tab | Moves the cursor a cell to the left of the active cell. |
| End + cursor Or Ctrl + cursor | To move at the end of a series of filled cells, with some content, or a series of empty cells. |
| PageUp and PageDn | To move a screen up or down. |
| Alt + PageUp and Alt + PageDn | To move of one screen to the left or to the right. |
| Ctrl + PageUp and Ctrl + PageDn | To move to the previous or following worksheet. |
| Ctrl + Home | To return to the upper left corner of the current worksheet. |
| Ctrl + End | To move in the last cell containing text, a number or a formula. |
| F5 or Ctrl + T | To move directly to any cell of the file. |
Blocks
There will be times when you will want to select several cells at one time in order to midify a presentation or to create charts or to take advantage of the other possibilities offered by Excel. The software offers you at least three ways to select a range of cells.But before starting, it's necessary to pay attention to the format of the cursor. The cursor changes format according to the place where it's located on the worksheet on even inside a cell. To select cells, the cursor must have the format of a big white "+" like this
1-Use the mouse.
To select a range of cells by using the mouse.
This is practical when the range of cells is relatively small. But what to do when you need to make a range of cells that's bigger than the screen? It's in this situation that using the mouse with the Shift key is more practical.
2-Use the Shift key.
By doing a block this way, you don't have to keep a finger on the mouse button. It avoids overshooting the width of the block that you wanted and to go back and fourth until you select the right size.
There is a last method that you should know. Both first possibilities offer you the possibility to make a continuous block. All the cells between both extremities of the block will be selected. But what can you do when the cells that you require are not next to each other? The last method demonstrates how you can make many blocks of cells with cells that are located everywhere in the worksheet.
3-Use the Ctrl key.
This last technique is very usefulare not located next to eachother. You can use it for example to select blocks that will be the source for a chart. But, it that last box, every block must represent at least a series of data for the chart, not just a lonely cell.
Data entry
There are three types of data that you can enter into a cell : text, numbers and formulas. The other objects, such as charts, drawings and maps, "float" over cells They don't affect the cells under it. To demonstrate the many way of entering your data, follow the following exercise:The active cell moved to the A2 cell that's directly below A1.
The active cell moved to the right of the last cell which is B2. The combination of the Shift and Tab keys would move the active cell back to the left.
You can also enter data and use the cursors to quickly pass to another cell and enter more data. The active cell should be the B3 cell.
As just you discovered, you may enter the contents of a cell by using the Enter, Tab and cursors keys and the formula bar.
Formulas
One of the biggest advantages of a spreadsheet is the automation of the calculations. By entering a formula instead of a number, it's easier to change the model and get the wanted results faster. Formulas should be used in every time it's possible. You use a spreadsheet to analyze and interpret the results. Leave the task of crunching the numbers to the spreadsheet.Every formulas begins with the +, - or = sign. An Excel functions always begin with a =.
Ex: =a1+a2 , =sum(a1:z20) , =average(a1:z20) , =vlookup(a1,B1:c20,2)
A mistake that's often committed by beginners using an Excel functions is to place a space between the name of the function and the first bracket. Ex: =sum () instead of =sum(). The name of the function and it's first bracket must be glued together: no spaces. Also, some functions need more than one parameter or information to work properly such as the =vlookup function above. A comma is used to separate these parameters.
To see the list of all the Excel functions, depending on the version of Excel that you have.
OR
It's possible to make a formula that uses the contents of cells that are in a different worksheet or even a different file! To do this, you must specify the name of the worksheet with the cell address. An exclamation point (!) is used to separate the name of the worksheet from the cell address.
Ex: =a1+sheet2!A1 , =sum(sheet1!A1:sheet3!A1)
To really take advantage of a spreadsheet, you must be able to use numbers coming from other worksheets and even from other files. The next part consists in explaining how to reach the contents of cells in other worksheets and then from other spreadsheets. If the file does not contain at least three worksheets, you can add them by using from the Insert menu the Worksheet option.
Numbers from another worksheet
OR
And now for the formula. It consists in adding the contents of the A1 cells from the first two worksheets of the file into the third worksheet.
This is the start of the formula. It's now necessary to select the needed cells in the formula.
OR
The formula is complete. The result should be 300. In fact, to reach any cell of the file that's not on the present worksheet, you must first write the name of the worksheet followed by the exclamation mark and the then address of the cell. Ex: =Sheet1! A1. There is another way of arriving at the same result.
OR
The new result of the A1 and A2 cells of the third worksheet should be 500.
All the functions can be also accomplished in "3D". That is by using the content of cells of other worksheets of the file.
Numbers from another worksheet
Imagine the possibilities if you could also use numbers coming from the other files! It's possible. This exercise demonstrates how to do it.The content of the first file is completed. The second file will come to look for this number in a few moments. It's easier to carry out this operation when both files are opened. Excel can open up to 99 files at the same time. To pass from a file to another, go to the Window menu and to choose the required file.
OR
OR
Click on the cell that you need.
OR
The formula should be =[ test1.xls ]Sheet1!$A$1.The name of the file is between brackets, followed by the name of the worksheet, an exclamation mark and the cell address.

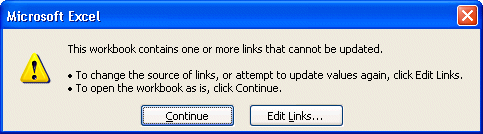
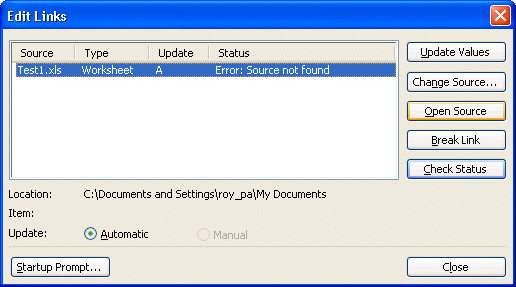
Every time you'll open this file, it's going to ask you is you wish to verify and update the references of the other files. For this example, it's about the contents of the Test1.xls file. To update the file, you must press the Yes button. Otherwise, the file will use the same data from the last update.
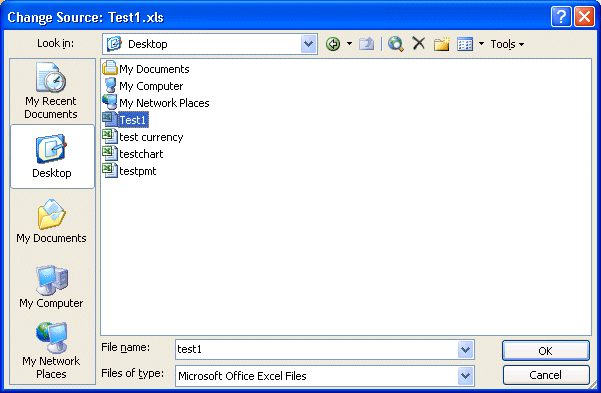
You must also pay attention where you put the "linked" file. If you delete it, or move it or rename the reference file, Excel will not be able to find it.
If you moved or renamed the file, you will have to indicate to Excel the new location or the new name of the file. After you selected to correct file, press the OK button to update the link.

You'll find more information about some Excel functions on the Web page on functions and formulas on this site.
Edit a cell's content
Instead of having to rewrite the contents of a cell, you can change it's contents to correct "typos" or the formula. There are three ways to change a cell's content.You must first place the cursor in the cell to be changed. Then,
OR
OR
The worksheets
It's on the worksheets that you can write down the text, the numbers, the formulas and the other elements of our model. It's possible that you want to distribute your model on to several worksheets. Every worksheet has a name that you will find at the bottom of the screen. By default, they are called Sheet1 , Sheet2 . This next part is going you to demonstrate how to add worksheets, to rename them, to move them and even to copy a complete worksheet.Add a worksheet
Even by placing your numbers on the worksheets that are shown, it's very possible that you need more worksheets. A spreadsheet can contain up to 100 worksheets.OR
Delete a worksheet
For aesthetic needs or any other reason, it's always possible to remove a worksheet of the file.Rename a worksheet
It's much more practical to help you to find of the information you need when the names of worksheets are more familiar to you such as "Budget" or "Forecasts" instead of Sheet1. There are various ways to rename a worksheet.OR
OR
Move a worksheet
Excel offers you also the possibility to quickly move a worksheet in your spreadsheet. You can move them between other worksheets.A small black arrow will indicate you the point of insertion if you Release the mouse button at this moment.
Copy a worksheet
Excel allows you also to copy all the contents of a working sheet with a variation of the last technique.Copy the contents without creating a new worksheet
Split the screen
This option splits the screen into several windows. This is very practical when you want to compare data that's distant from one to another. For example, you want to compare this month's numbers with last year's or the forecast for next year. However, there is twelve months worth of data separates the two. The next exercise consists of showing you how to put two cells next to another by splitting the screen.
The worksheet is now separated into four parts. It's also possible to separate the screen only vertically or horizontally. Just above the vertical bar
The F6 key serves for moving from one area to another. If you press it several times, you'll notice that the cursor moves in a clockwise fashion. The Shift and F6 keys "turns" the cursor counter clockwise. Zones move in a synchronized way as you move horizontally or vertically.
To remove the divider bars
OR
OR
Freeze a part of the screen
On a worksheet, it's important to have titles that describe the numbers. It's important to see these titles at all times. After all, the numbers are used to describe something. The Excel designers, as well as the other spreadsheet programs available on the market, recognized this fact. The option to freeze part of the screen allows you to always have certain area visible on the screen.
Although you moved on the worksheet, the text that you wrote above and to the left of the place that you fixed the shutters is always visible. To return to a normal page.
No comments:
Post a Comment