Introduction
It's preferable by moments to present the data on tabular form. The instructions that follow will demontrate you how to create a table and how to take advantage of it. The first thing, to be known is that you can enter several rows of text in the same cell of the table. It's not necessary to count the number of rows that will go to a table but a number of "cells". For example, the advantages and the disadvantages or to compare several options.Insert a table
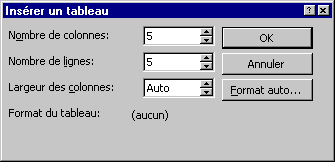
A window will appear asking you for the number of columns and rows that you need for your table. enter the numbers that you need. You can later add or remove rows or columns.
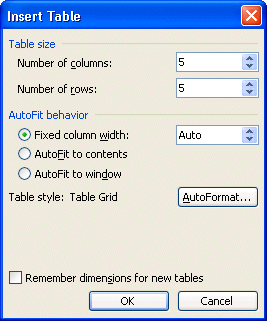
There is another way of inserting a table into a document; by using the button To insert table.

If you don't see the borders of the cells of the table, select the option covering of the Table menu. When the border of the table consists of dotted rows, it means that no border will be shown in the printing.
Change the width of columns
There are two ways to change the width of a column: by using the ruler for tables or by using the menu Format. Both ways will be explained. The first will be by using the ruler..
Above the text, there is a ruler as that appears. It's used to change the width of columns and also margins inside cells. The first triangle at the top of the bar pointing downward serves for adjusting the left margin of the first row of the cell. The triangle of the left lower corner serves for adjusting the left margin besides of the text of the cell. The triangle in the lower right corner serves for adjusting the right margin of all the text of the cell.
Here is the procedure to change the width of a column by using the mouse.
To recognize it, it's the checkerboard
 that separates each of the columns. Attention not to take inadvertently the triangle of the right margin. The cursor will change format. The cursor will be now a horizontal bar with a point in every extremity.
It is to note that columns in the right-hand side of the column that you chose fit automatically not to exceed the margins of the page. By selecting a column, you can change its just width a little or a lot according to your needs. You can also give a fixed width in a column.
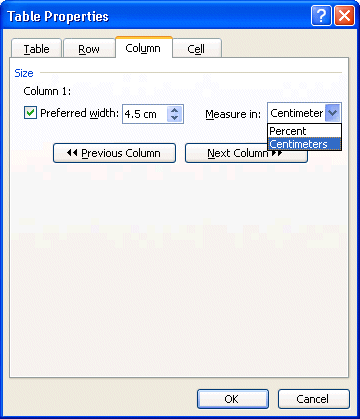
You can change the width of a column as often as you want it and with the degree of precision that you want. Or by using the mouse or one of the options of the menu table.
Add a row
The new row will fit over where is the cursor at the moment.
Add a column
It's easier to insert a row than a column. You must first select the column completely in the right-hand side of the column that you want to insert.Here is the rest of the procedure to insert a new column.
The new column will add to the left where from is the cursor at the moment. It's very possible that the table exceeds the margins of the page. You should change the width of columns.
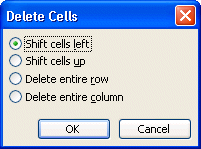
Delete a row or a whole column
Merge cells
This will enable you to group together in a single cell several cells of the same row.All the cells will now form only one long cell. You can also cut cells by using the command to split cell. It is better to merge cells when you do not plan on adding more columns. If you add a column after the merge, you might have to adjust manually the width of the column.
Change a table's presentation
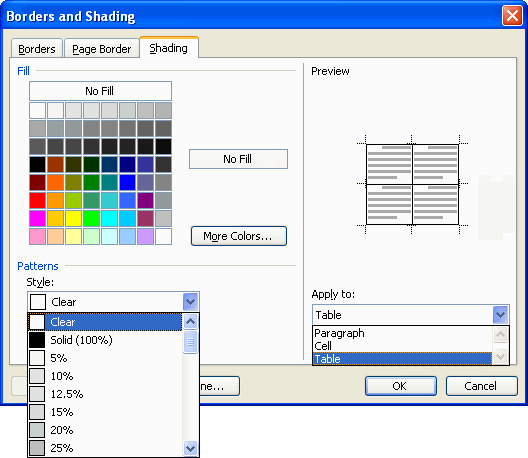
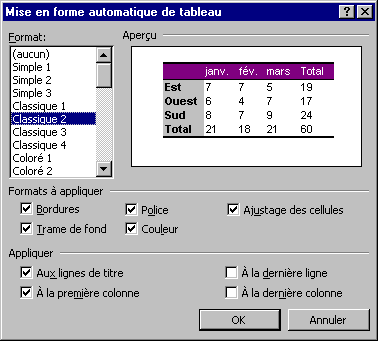
Word offers you some options to change the presentation of a table. You can change the color of a cell or a table for another color or pattern. There are also several possibilities, to change the border that surrounds the cells of the table. Word offers you also predetermined styles of presentations that you can use any time.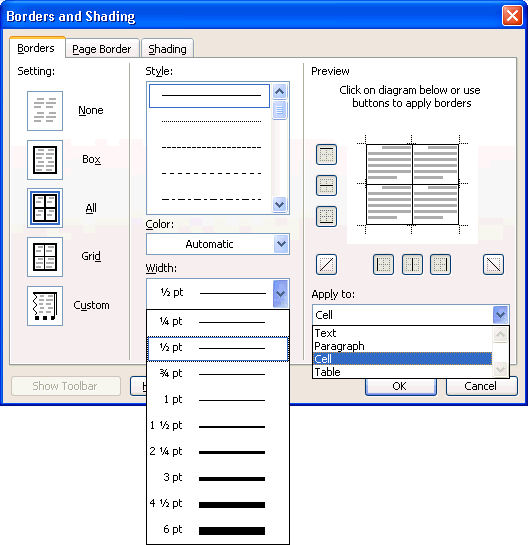
Most of these options are also available from the toolbar Tables and borders. This toolbar will be explained besides details at the time of explaining how to draw a table.
Draw a table
The previous part of this page explained the "formal" way of creating a table. With this version of Word, it's possible "to draw" a table. That is to elaborate quickly a table that answers exactly your needs without going through a long series of instructions.If the toolbar is not above the text but in the middle of the screen, you can move it to a prefered location.
To begin a new table.
This cell can than be cut in several smaller cells where the other cells can there become attached to the left, to the right-hand side or below this one.
To cut a cell in two:You can cut a cell horizontally or vertically. You can even cut a cell several times. The cut does have to be exactly in the middle of the cell.
To erase a row or to merge two cells that are next to each other.
This will not not just erase a border. It will merge both cells to become one. It is better sometimes to present data on tabular form. The instructions that follow, will demonstrate, how to create a table and take advantage of it.The first thing, is that you can enter several rows of text in the same cell of the table. It is not necessary to count the number of rows that will go ino a table but a number of "cells". For example; the advantages and the disadvantages or comparing several options.
Insert a table
A window will appear asking you for the number of columns and rows that you need for your table. Enter the numbers that you need. You can later add or remove rows or columns if needed.
There is another way of inserting a table into a document; by using the button "To insert table".
If you don't see the borders of the cells of the table, select the option covering of the Table menu. When the border of the table consists of dotted rows, it means that no border will be shown in the printing.
Change the width of columns
There are two ways to change the width of a column: by using the ruler for tables or by using the menu Format. Both ways will be explained. The first will be by using the ruler.Above the text, there is a ruler as like shown here. It is used to change the width of a columns and also the margins inside a cell. The first triangle, at the top of the bar pointing downward serves for adjusting the left margin of the first row of the cell. The triangle at the left lower corner is used for adjusting the left margin besides the text of the cell. The triangle in the lower right corner is used for adjusting the right margin of all the text of the cell.
Here is the procedure to change the width of a column by using the mouse.
To recognize it, it's the checkerboard that separates each of the columns. Please be carefull do not take inadvertently the triangle of the right margin. This will change the format of the cursor. The cursor will now be a horizontal bar with a point in every extremity.
that separates each of the columns. Please be carefull do not take inadvertently the triangle of the right margin. This will change the format of the cursor. The cursor will now be a horizontal bar with a point in every extremity.It is to note that columns in the right-hand side of the column that you chose fit automatically not to exceed the margins of the page. By selecting a column, you can change it`s width just a little or a lot according to your needs. You can also give a fixed width to a column.
You can change the width of a column as often as you want. With the degree of precision that you want. Or by using the mouse or one of the options of the Table menu.
Add a row
The new row will fit over where is the cursor at the moment.
Add a column
It's easier to insert a row than a column. It is first necessary, to select the column completely in the right-hand side of the column that you want to insert.
Here is the rest of the procedure to insert a new column.
The new column will be added to the left of the cursor present location. It is a possiblility that the table will now exceeds the margins of the page. You might have to modify the width of the columns.
Delete a row or a whole column
Merge cells
The intention of this command is to group together in a single cell several cells of the same row.All the cells will now form one single cell. You can also cut cells by using the command to split cell. It's better to merge cells when you are certain that you will not be adding no more other columns. If you add a column after the fusion, it is possible, that you might have to adjust manually the width of the column.
Change the presentation of a table
Word offers you some options to change the presentation of a table. You can change the color of a cell or a table for another color or pattern. There are also several possibilities to modify the border that surrounds the cells of the table. Word offers you also predetermined styles of presentations that you can use any time.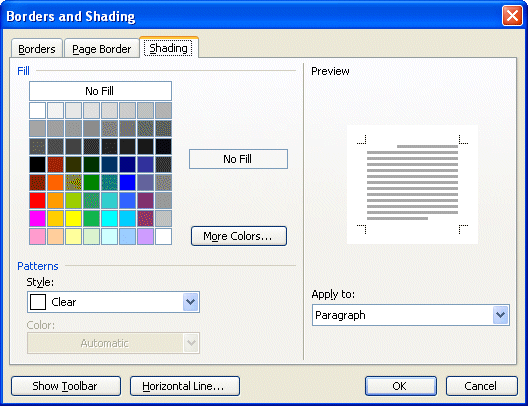
Most of these options are also available from the toolbar Tables and borders. This toolbar will be explained in details when explaining how to draw a table.

Draw a table
The previous part of this page explained the "formal" way of creating a table. With this version of Word, it is possible "to draw" a table. That is, to elaborate quickly a table that answers exactly your needs without going through a long series of instructions. There is now a new toolbar that gives you all the options necessary to carry out that task. This toolbar must first be activated in order to use it.If the toolbar is not above the text but indeed in the middle of the screen, it's possible, to move it.
To begin a new table.
This cell can than be cut in several smaller cells, the remaining cells still attached either to the left, to the right-hand side or below.
To cut a cell in two:
You can cut a cell horizontally or vertically. You can even cut a cell several times it does not need to be in the middle of the cell.
To erase a row or to merge two cells that are next to each other.
This will not just erase a border. It will merge both cells and make them become one.
No comments:
Post a Comment